Showing posts with label Operating System. Show all posts

Sunday, 4 March 2012

Use Your Computer Hard Disc As RAM

Use Your Computer Hard Disc As RAM


Everybody knows how costly is to buy a new RAM. SO, in order to get almost equal performance, we can also use some memory from our Hard Disc as virtual memory, which acts as a substitute to RAM. Follow the simple steps stated below to do so....
1. Right Click on My Computer & go to Properties
2. Click on Advanced Tab & go to Settings in the Performance Section.
3. Select the next "Advanced" Tab on the "Performance Options" window. On the advanced tab, click the "Change" button in the "Virtual memory" section.
4. Comprehend the implications of the virtual memory settings. On the "Virtual Memory" window, the "initial size" is the minimum amount of hard drive space Windows will allocate to virtual memory. The "maximum size" is the largest size to which Windows will allow your virtual memory to grow. If you set this setting too low and Windows requires more virtual memory than the maximum, Windows will likely crash or freeze and you will need to reboot. Thus, you should select (or keep the selection as) "System managed size." By allowing Windows to manage the virtual memory, Windows will increase and decrease the size of the virtual memory as-needed. It is not recommended under any circumstances to select "No paging file" because this can cause system instability.

Thursday, 1 March 2012

Prevent Windows Update From Automatically Restarting Your PC

Windows Update's automatic reboot can be one of the most annoying "features" in Microsoft operating systems. While it's a bit less pushy with Windows Vista and 7, allowing users to postpone the restart for up to four hours, you may not be at the computer to intercept the first or subsequent notifications.

In many cases this isn't a major deal. However, it can be frustrating if you step away from a work session and come back to a freshly rebooted system. You might also be downloading a large file or letting a lengthy operation run while away from your PC, expecting it to be finished upon return.
figure 1


Fortunately there are various workarounds available. Today we will mention a few that have been tested to work in XP, Vista and Windows 7 systems.

Temporary WorkaroundsThe methods below will disable the nagging reminders after Windows Update runs by stopping the associated service. They are only temporary solutions because Windows will automatically start the service again when you reboot, which means you might be faced with the same problem the next time Windows updates are installed. In other words, this is your one-time off solution.
figure 2

Windows XP: Open Start > Run and enter the following command: net stop "automatic updates" OR sc stop wuauserv. You can also suspend the process with PsSuspend and the command pssuspend wuauclt.

Windows Vista/7: Open Start and search for cmd. Right click on the found program and click Run as administrator. Enter the command net stop "windows update" and you're good to go. Likewise, you can suspend the process with PsSuspend and the command pssuspend wuauclt.


Permanent FixUnfortunately most of the everlasting system tweaks out there are unavailable to "Home" users -- that includes even Home Premium versions as these lack the group policy editor and a few other "advanced" Windows features. However, the third party application Shutdown Guard works well, and even prevents other applications from rebooting your PC.
For users of Professional, Ultimate and other upper-tier versions of Windows, you can adjust a few things in your group policy settings or system registry:
figure  3


Windows XP: Start > Run > enter gpedit.msc. Navigate to Local Computer Policy > Computer Configuration > Administrative Templates > Windows Components > Windows Update. Double click "No auto-restart for scheduled Automatic Updates installation," then choose Enabled and click OK.

Windows Vista/7: Start > search for gpedit.msc. Navigate to Computer Configuration > Administrative Templates > Windows Components > Windows Update and enable "No auto-restart for scheduled Automatic Updates installations".


figure  4


All non-Home users can apply the same policy change by adding a new key to the registry. Go to Start > Run/Search for regedit. Navigate to HKEY_LOCAL_MACHINE\ SOFTWARE\ Policies\ Microsoft\ Windows\ WindowsUpdate\ AU. Create a new 32-bit DWORD value named NoAutoRebootWithLoggedOnUsers and give it a value of 1. You can also download and double click on this registry key to add the key automatically.


How To Prevent Auditable Activities When Security Log Is Full

 Use this tool at your own risk

If you have set the security log either to "Overwrite Events Older than n Days" or "Do Not Overwrite Events (Clear Log Manually)", you may want to prevent auditable activities while the log is full so no new audit records can be written. To do this:
  1. Run Registry Editor (REGEDT32.EXE).
  2. From the HKEY_LOCAL_MACHINE\SYSTEM subtree, go to the following key:

    \CurrentControlSet\Control\Lsa\
  3. Add the entry:

    Key: CrashOnAuditFail
    Type: REG_DWORD
    Value: 1
  4. Save the changes. The Change will take effect the next time the computer is started. Update the Emergency Repair Disk to reflect these changes.
If Windows NT halts as a result of the security log becoming full, the system must be restarted and reconfigured to restore it to high-level security. When Windows NT restarts, the Security log is full and so no auditable actions are recorded until the Security log is cleared.

To recover when windows nt halts because it cannot generate an audit event record:
  1. Restart the computer and log on using an account in the Administrators group.
  2. Use Event Viewer to clear all events from the Security log, archiving the currently logged events. For details, see the "Event Viewer" chapter in the Windows NT Workstation or Windows NT Server System Guide.
  3. Use the Registry Editor to delete and replace value entry CrashOnAuditFail, with data type REG_DWORD and value 1, under HKEY_LOCAL_MACHINE\SYSTEM\CurrentControlSet\Control\Lsa (as described above).
  4. Exit and restart the computer.


Net user command : Manage user accounts from command line

Using Net user command, administrators can manage user accounts from windows command prompt. Below are some examples on how to use this command.

Add a domain user account
Net  user add newuser_loginid  newuser_password /domain


Add new user on local computer
Net  user add  newuser_loginid  newuser_password


Disable/Lock a domain user account
Net user loginid  /ACTIVE:NO /domain
To enable/unlock a domain user account
Net user loginid /ACTIVE:YES  /domain
Prevent users from changing their account password
Net user loginid /Passwordchg:No 
To allow users to change their password
Net user loginid /Passwordchg:Yes
To retrieve the settings of a user:
Net user username


Example:

C:\>net user prem

User name                    prem

Full Name

Comment
User's comment
Country code                 000 (System Default)
Account active               Yes
Account expires              Never
Password last set            4/21/2011 10:10 PM
Password expires             8/19/2011 10:10 PM
Password changeable          4/21/2011 10:10 PM
Password required            Yes
User may change password     Yes
Workstations allowed         All
Logon script
User profile
Home directory
Last logon                   Never
Logon hours allowed          All
Local Group Memberships      *Users
Global Group memberships     *None
The command completed successfully

How to Use Net User in Windows XP

  • 1 Open the Windows command shell. Go to the Start menu and click the "Run..." button. Type "CMD" into the open field and click "OK."

  • 2 Type "net user" into the command prompt (without the quotation marks) and press "Enter" on your keyboard. Entered without any parameters, the net user command will return a list of the user accounts on your computer.

  • 3 Pick the account that you want to alter. For example, If you want to view an account named JohnDoe, type "net user JohnDoe" into the command prompt. This will return information on the JohnDoe account, including system privileges and login dates and times

  • 4 Enter "net user JohnDoe /delete" to delete JohnDoe. This will remove the account from your computer. You can also disable the account without deleting it by typing "net user JohnDoe /active:no." To reactivate the account, type "net user JohnDoe /active:yes."

  • 5 Change JohnDoe's ability to change his own password. Type "net user JohnDoe /passwordchg:" and enter either "yes" or "no." For example, to give JohnDoe the ability to change his own password, type "net user JohnDoe /passwordchg:yes." To change whether or not JohnDoe's account needs a password, type "net user JohnDoe /passwordreq:" followed by either "yes" or "no."

  • 6 Create a new account by using the "/add" parameter. For example, to add an account called JohnSmith, type "net user JohnSmith /add."

  • 7 Set accounts to expire on a certain date. To set JohnDoe's account to expire on December 10, 2011, for example, type "net user JohnDoe /expires:12/10/2011." If you want the account to never expire, replace the date with "never."

Sunday, 26 February 2012

How to change the COM port for a USB Serial adapter on Windows 7

How to change the COM port for a USB Serial adapter on Windows 7

Start by going to the Device Manager. Once there do the following:
Expand the Ports ‘(COM& LPT)’

You should be looking at something like this:


As you can see Windows has set the port to COM10. However many legacy applications expect the port to be between 1-4. Let’s change that:
Right click on the device and click on ‘Properties’.


Thursday, 23 February 2012

Open a port in Windows Firewall - Windows 7


Open a port in Windows Firewall- Windows 7

If Windows Firewall is blocking a program and you want to allow that program to communicate through the firewall, you can usually do that by selecting the program on the Exceptions tab in Windows Firewall. To learn how to do this, see Allow a program to communicate through Windows Firewall.
However, if the program isn't listed on the Exceptions tab, you might need to open (add) a port. For example, to play a multiplayer game with friends online, you might need to open a port for the game so that the firewall allows the game information to reach your computer. Unlike an exception, which is only open during the time that it is needed, a port stays open all the time, so be sure to close ports that you don't need anymore.
  1. Open Windows Firewall by clicking the Start button Picture of the Start button, clicking Control Panel, clicking Security, and then clicking Windows Firewall.
  2. Click Allow a program through Windows Firewall. Administrator permission required If you are prompted for an administrator password or confirmation, type the password or provide confirmation.
  3. Click Add port.
  4. In the Name box, type a name that will help you remember what the port is used for.
  5. In the Port number box, type the port number.
  6. Click TCP or UDP, depending on the protocol.
  7. To change scope for the port, click Change scope, and then click the option that you want to use. ("Scope" refers to the set of computers that can use this port opening.)

Monday, 20 February 2012

How to Use a System Repair Disc to Restore Windows 7

How to Use a System Repair Disc to Restore Windows 7

 Windows 7 won't start or starts with significant problems, you may need to use the System Repair Disc to fix problems with Windows 7. The System Repair Disc is designed to let you boot up Windows — even if nothing else works — and provides you with several options for repairing your failing system.
You need to create the system repair disc. If you don’t create one, you limit your recovery options. The system repair disc is not the same thing as the recovery disc that came with your computer. It won’t reinstall Windows 7 and it won’t reformat your computer. It's simply a gateway to Windows' built-in recovery tools.

1.Insert the System Repair disc in the DVD drive and restart the computer.
If necessary, turn off the power, count to ten, and turn the power back on.

2.For just a few seconds, the screen displays Press any key to boot from CD or DVD. Press any key. Click Next.
If you aren't quick enough, you'll have to restart the computer again. When Windows is finished loading files, the first System Recover Options dialog box appears. Note: Change the keyboard input method if US isn't correct.

3.When System Recover is finished searching for Windows installations, click Next
.
4.Choose Use Recovery Tools That Can Help Fix Problems Starting Windows. Click Next.

Windows will provide several tools that you can use to repair your system, including using the system image, if you have one available.

5.Choose a Recovery Tool:
Choose the tool that best suits your situation. Best recommendation: Use the first three options in the order listed, restarting after each one.

•Startup Repair: A good first attempt. Automatically fix problems that are preventing Windows from starting.

•System Restore: Restore Windows to an earlier point in time. Choose this option if Windows 7 starts, but something has changed since a recent installation or update. You'll pick a restore point based on date and time (start with the most recent). You may lose recent program changes, but not your data

How to Open a Port in the Windows 7 Firewall

How to Open a Port in the Windows 7 FirewallWhen you use a firewall — and you should — you change the way your computer communicates with other computers on the Internet. The firewall blocks all incoming communications unless you open a port in the Windows firewall to let a specific IP communicate with your computer. For example, if you want to play many online games.
Most first-time firewallers are overwhelmed by the idea of opening a port. Although open ports are a security threat, sometimes you truly need to open one. Still, you may need to open a port to enable a specific application. For example, when you select the check box to allow Remote Desktop, you’re opening port 3389. That’s the security price you pay for enabling programs to talk to each other.In general, if you need to open a specific port, the documentation for the program (game, torrent downloader, file sharer) will tell you . . . assuming you read the program’s manual.

Step 1

Choose Start→Control Panel. Click the System and Security link and then click Windows Firewall.


Step 2

On the left, click the Advanced Settings link.

Step 3

On the left, click Inbound Rules. Then, on the right, under Actions, click the New Rule link.


Step 4 :   Select the option marked Port and click Next.The wizard asks you to specify which ports.

Step 5 :In the Specific Local Ports box, type the ports you want to open, separated by commas, and then click Next.For example, in this case, the TCP ports that need to be opened are 418, 419, 420, and 421. The wizard takes action and opens those ports to receive data.

Step 6 : Choose Allow the Connection and click Next.The New Inbound Rule Wizard wants to know whether it should apply this rule if you’re connected to a domain network, a private network, or a public network. The safest option is to make it only open on your home network.


Step 7   : Check the boxes for Private or any other desired network type, and then click Next.


Step 8 :Type a name (usually the name of whatever program required the opening). Click Finish.

Your new rule appears in the Inbound Rules list. It takes effect immediately

OPEN PORT PERSONAL COMPUTER

Open Windows Firewall by clicking the Start button Picture of the Start button, clicking Control Panel, clicking Security, and then clicking Windows Firewall.
  1. Click Allow a program through Windows Firewall. Administrator permission required If you are prompted for an administrator password or confirmation, type the password or provide confirmation.
  2. Click Add port.
  3. In the Name box, type a name that will help you remember what the port is used for.
  4. In the Port number box, type the port number.
  5. Click TCP or UDP, depending on the protocol.
  6. To change scope for the port, click Change scope, and then click the option that you want to use. ("Scope" refers to the set of computers that can use this port opening.)
For Example allow VNC when Fire wall on In PC

step1
ADD program its want run

and open port u want for ( ex - VNC port - 5900)


add port . Program run when firewall is open


Monday, 13 February 2012

To view certificates in the MMC snap-in


To view certificates in the MMC snap-in

  1. Open a Command Prompt window.
  2. Type mmc and press the ENTER key. Note that to view certificates in the local machine store, you must be in the Administrator role.
  3. On the File menu, click Add/Remove Snap In.
  4. Click Add.
  5. In the Add Standalone Snap-in dialog box, select Certificates.
  6. Click Add.
  7. In the Certificates snap-in dialog box, select Computer account and click Next. Optionally, you can select My User account or Service account. If you are not an administrator of the computer, you can manage certificates only for your user account.
  8. In the Select Computer dialog box, click Finish.
  9. In the Add Standalone Snap-in dialog box, click Close.
  10. On the Add/Remove Snap-in dialog box, click OK.
  11. In the Console Root window, click Certificates (Local Computer) to view the certificate stores for the computer.
  12. Optional. To view certificates for your account, repeat steps 3 to 6. In step 7, instead of selecting Computer account, click My User account and repeat steps 8 to 10.
  13. Optional. On the File menu, click Save or Save As. Save the console file for later reuse.

Viewing Certificates with Internet Explorer

You can also view, export, import, and delete certificates by using Internet Explorer.

To view certificates with Internet Explorer

  1. In Internet Explorer, click Tools, then click Internet Options to display the Internet Options dialog box.
  2. Click the Content tab.
  3. Under Certificates, click Certificates.
  4. To view details of any certificate, select the certificate and click View.

Disable Apple Software Update Screen (Windows)

Disable Apple Software Update Screen (Windows)

in Software, Windows 7, Windows Vista, Windows XP


The Apple Software Update kept appearing on my computer and I couldn’t figure out what was causing this annoyance. I didn’t find it in my Startup folder or in the registry anywhere. Soon I discovered it was in my Scheduled Tasks. Here is how you can prevent the Apple Software Update screen from appearing.
Apple Software Update Screen

Windows 7/Vista

1. Click the Windows Start orb in the lower-left corner and type task scheduler in the Start Search box. Press Enter.
2. Expand the Task Schedule Library section.
3. Select the Apple folder.
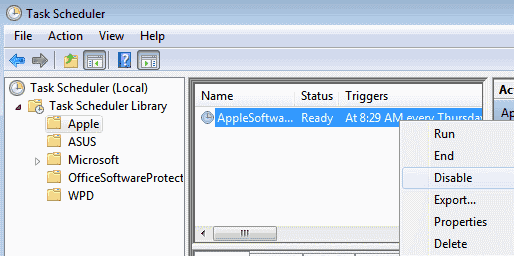
4. Right-click AppleSoftwareUpdate and select Disable or Delete.
Disable Apple Update in Task Scheduler

XP

1. Click Start > Programs > Accessories > System Tools > Scheduled Tasks.
2. Right-click on AppleSoftwareUpdate and select Delete.
Delete Apple Software Update

Configuring Automatic Updates by using local Group Policy

Configuring Automatic Updates by using local Group Policy

  1. Click Start, and then click Run.
  2. Type gpedit.msc, and then click OK.
  3. Expand Computer Configuration.
  4. Right-click Administrative Templates, and then click Add/Remove Templates.
  5. Click Add, click Wuau.adm in the Windows\Inf folder, and then click Open.
  6. Click Close.
  7. Under Computer Configuration, expand Administrative Templates, expand Windows Components, and then expand Windows Update.

    The Configure Automatic Updates policy appears. This policy specifies whether the computer receives security updates and other important downloads through the Windows Automatic Updates feature. The settings for this policy let you specify if automatic updates are enabled on the computer. If the service is enabled, you must select one of the three configuration options.
  8. To view the policy settings, double-click the Configure Automatic Updates policy.
  9. To turn on Automatic Updates, click Enabled in the list of options that appear at the top of the Setting tab.

    If you click Enabled, you must select one of the three configuration options that are listed in step 10.
  10. Select one of the following three options:
    • 2 - Notify for download and notify for install

      When Windows finds updates that apply to this computer, an icon appears in the notification area, and a message appears that states that the updates are ready to be downloaded. If you click either the icon or the message, the option that you use to select the updates you want to download appears. Windows downloads the selected updates in the background. When the download is complete, the icon appears in the notification area again, and a message appears that states that the updates are ready to be installed. If you click either the icon or the message, the option that you use to select the updates you want to install appears.
    • 3 - Auto download and notify for install

      Note This setting is the default setting.

      Windows finds updates that apply to your computer, and then downloads these updates in the background.The user is not notified or interrupted during this process. When the download is complete, the icon appears in the notification area, and a message that states that the updates are ready to be installed appears. If you click either the icon or the message, the option that you use to select the updates you want to install appears.
    • 4 - Auto download and schedule the install

      To specify the schedule, select the appropriate options in the Group Policy Settings dialog box. If you do not specify a schedule, the default schedule for all installations is used. This schedule is every day at 3:00 A.M. If any one of the updates require you to restart the computer to complete the installation, Windows restarts the computer automatically. (If a user is logged on to the computer when Windows is ready to restart it, the user is notified that Windows will restart. The user can chose to delay the restart operation.)

      If you select 4 - Auto download and schedule the install you can set a recurring schedule. If you do not set a schedule, all updates are downloaded and installed every day at 3:00 A.M.
    • Other Options

      Additionally, you can select either the Disabled option or the Not Configured option. If you select Disabled, an administrator must download and install any available updates manually from the Microsoft Windows Update Web site.

      If you select Not Configured, the status of Automatic Updates is not specified at the Group Policy level. The status is either "enabled" or "not enabled." However, an administrator can still configure Automatic Updates by using Control Panel. Control Panel includes the same settings that are available in Group Policy.
Note An updated Administrative Template (.adm file) is now available for use with the Automatic Updates feature in Windows Server 2003 and the Software Update Services (SUS) Service Pack 1 (SP1) client. This updated policy file adds two new policies:
  • Reschedule Automatic Updates scheduled installations

    This policy specifies the time that Automatic Updates has to wait after the computer starts, before it proceeds with a scheduled installation that was missed previously.
  • No auto-restart for scheduled Automatic Updates installations

    This policy specifies that Automatic Updates will wait for the computer to be restarted by any user who is logged on to complete a scheduled installation. If this policy is not used, the computer restarts automatically.
The updated client and policy file is included in Windows Server 2003. To download the SUS SP1 client for Windows 2000-based and Windows XP-based computers, visit the following Microsoft Web site:
(http://www.microsoft.com/downloads/details.aspx?FamilyID=799432fb-c196-4f01-8cce-4f9ea58d6177&DisplayLang=en)
To download the updated Administrative Template for Windows 2000-based and Windows XP-based computers, visit the following Microsoft Web site:
(http://microsoft.com/downloads/details.aspx?FamilyId=D26A0AEA-D274-42E6-8025-8C667B4C94E9&displaylang=en)

Loading policy settings by using Group Policy in Active Directory directory services

To load policy settings by using Group Policy, you must use the Wuau.adm file that describes the new policy settings for the Automatic Updates client. Wuau.adm is automatically installed in the Windows\Inf folder when you install the new Automatic Updates feature.

You can load Windows\Inf\Wuau.adm as an administrative template in Group Policy Object Editor.

To load policy settings by using Group Policy in Active Directory:
  1. On an Active Directory domain controller, click Start, and then click Run.
  2. Type dsa.msc.
  3. Right-click the organizational unit or domain where you want to create the policy, and then click Properties.
  4. Click the Group Policy tab, and then click New.
  5. Type a name for the policy, and then click Edit.
  6. Under Computer Settings, right-click Administrative Templates.
  7. Click Add/Remove Templates, and then click Add.
  8. Type the name of the Automatic Updates .adm file, for example, type windows_folder\inf\wuau.adm.
  9. Click Open.

Configuring Automatic Updates by editing the registry

Important This section, method, or task contains steps that tell you how to modify the registry. However, serious problems might occur if you modify the registry incorrectly. Therefore, make sure that you follow these steps carefully. For added protection, back up the registry before you modify it. Then, you can restore the registry if a problem occurs. For more information about how to back up and restore the registry, click the following article number to view the article in the Microsoft Knowledge Base:
(http://support.microsoft.com/kb/322756/ ) How to back up and restore the registry in Windows


In a non-Active Directory environment, you can edit registry settings to configure Automatic Updates.

Note You must manually create these registry keys.

You can use either of the following methods to set these registry keys:
  • Manually edit the registry by using Registry Editor (regedit.exe).
  • Centrally deploy these registry keys by using the Windows NT 4.0-style System Policy functionality.
To use Registry Editor, follow these steps:
  1. Click Start, click Run, and then type regedit in the Open box.
  2. Locate and then click the following key in the registry:
    HKEY_LOCAL_MACHINE\SOFTWARE\Policies\Microsoft\Windows\WindowsUpdate\AU
  3. Add any one of the following settings:
    • Value name: NoAutoUpdate
      Value data: 0 or 1
      • 0: Automatic Updates is enabled (default).
      • 1: Automatic Updates is disabled.
      Registry Value Type: Reg_DWORD
    • Value name: AUOptions
      Value data: 1 to 4
      • 1: Keep my computer up to date has been disabled in Automatic Updates.
      • 2: Notify of download and installation.
      • 3: Automatically download and notify of installation.
      • 4: Automatically download and scheduled installation.
      Registry Value Type: Reg_DWORD
    • Value name: ScheduledInstallDay
      Value data: 0 to 7
      • 0: Every day.
      • 1 through 7: The days of the week from Sunday (1) to Saturday (7).
      Registry Value Type: Reg_DWORD
    • Value name: ScheduledInstallTime
      Value data: n, where n equals the time of day in a 24-hour format (0-23).
      Registry Value Type: Reg_DWORD
    • Value name: UseWUServer
      Value data: Set this value to 1 to configure Automatic Updates to use a server that is running Software Update Services instead of Windows Update.
      Registry Value Type: Reg_DWORD
    • Value name: RescheduleWaitTime
      Value data: m, where m equals the time to wait between the time Automatic Updates starts and the time it begins installations where the scheduled times have passed. The time is set in minutes from 1 to 60, representing 1 minute to 60 minutes)
      Registry Value Type: Reg_DWORD

      Note This setting only affects client behavior after the clients have updated to the SUS SP1 client version or later.
    • Value name: NoAutoRebootWithLoggedOnUsers
      Value data: Reg_DWORD: 0 (false) or 1 (true). If set to 1, Automatic Updates does not automatically restart a computer while users are logged on.
      Registry Value Type: Reg_DWORD

      Note This setting affects client behavior after the clients have updated to the SUS SP1 client version or later.
    To use Automatic Updates with a server that is running Software Update Services, see the Software Update Services Deployment white paper. To view this white paper, visit the following Microsoft
When you configure Automatic Updates directly by using the policy registry keys, the policy overrides the preferences that are set by the local administrative user to configure the client. If an administrator removes the registry keys at a later date, the preferences that were set by the local administrative user are used again.

To determine the server that is running SUS that your client computers and servers go to for their updates, add the following f registry values to the registry:
HKEY_LOCAL_MACHINE\SOFTWARE\Policies\Microsoft\Windows\WindowsUpdate\


Value name: WUServer
Registry Value Type: Reg_SZ
This value sets the SUS server by HTTP name (for example, http://IntranetSUS).

Value name: WUStatusServer
Registry Value Type: Reg_SZ
This value sets the SUS statistics server by HTTP name (for example, http://IntranetSUS).

Using Task Scheduler to schedule the computer to shut down and restart at a specific time

Using Task Scheduler to schedule the computer to shut down and restart at a specific time

  • Click Start, Run and type control schedtasks
  • Double-click Add Scheduled Task. The Scheduled Task Wizard starts.
  • Click Next.
     
  • Under Click the program you want Windows to run, click Browse.
     
  • In the Select Program to Schedule dialog box, locate the %SystemRoot%\System32 folder, locate and click the Shutdown.exe file, and then click Open.
  • Under Perform this task, specify a name for the task and how frequently you want this task to run, and then click Next.
  • Under Select the time and day you want this task to start, specify a start time and date for the task, and then click Next.
  • Type the user name and password to run this task under, and then click Next.
  • Click to select the Open advanced properties for this task when I click Finish check box, and then click Finish.
  • Click the Task tab. In the Run box, specify any additional parameters that you want to use with Shutdown.exe. Click OK.
Important: In the 10th step, you need to add the parameters for the Shutdown.exe command. To immediately shutdown the system (0 second timeout), the command-line would be:
shutdown.exe -s -t 00
To reboot the system immediately, this command:
shutdown.exe -r -t 00
For additional help, type Shutdown /? at the Command Prompt. Scheduling the Shutdown.exe without any parameters will not help. It will just execute with a exit code 0 (success)

Wednesday, 8 February 2012

How to block websites on Windows 7, Windows XP and older version

How to block websites on Windows 7, Windows XP and older version

Sometimes we need to block one or several websites for security or access purpose. The most easiest way to block a website in respect of all browser ( Firefox, Internet explorer, Goggle chrome, safari,etc) is modifying the Windows “Host” file.

Steps:-

1. It is very easy process, but before you start modifying host file you must backup your host file for Data recovery purpose in case of any problem.

2. Make sure you are log in as administrator to get access of windows folder file modification.

3. The location of the hosts file depends on your operating system.

Windows XP, Vista and Windows 7:- C:\WINDOWS\system32\drivers\etc\hosts
Windows 2000:- C:\WINNT\system32\drivers\etc\hosts

4. Now open the “hosts” file with Notepad (you can do that by right clicking on the file and choose “Open” then select Notepad).

5. After open the file go to the below the line where you find “127.0.0.1 Localhost”. Now Type 127.0.0.1 then TAB and enter your desire URL that you want to blocked. You may add as many URL as you want, but every URL must be in new line.
block websites on Windows 7, Windows XP and older version
Block Website in Windows OS

6. Save the file and Reboot your computer to apply the changes.

7. For an example, lets say I want to block “yahoo” from being accessed from this computer all I would do is add “127.0.0.1 www.yahoo.com”. It’s also a good idea to add another line without the “www” but this step may not be necessary, test and try.

8. Now try to accessing the site you are trying to block. You should see “Unable to connect” web page.

You can add as many sites to block as you like by similar process.

Note: If you set proxy address for your browser, then it will not work properly.

How to disable or Limit access of Control Panel in Windows NT, 2000, XP

How to disable or Limit access of Control Panel in Windows NT, 2000, XP

Sometimes, we need to restrict access to control panel from user so that they can't access control panel.

Steps to limit access or disable control panel:

1. Go to START->RUN->Type "gpedit.msc",Then Enter OK.
2. A new window will open, In the left pane, we will see a Tree, Here we have to expand the tree by Clicking (+) sign.
Disable or Limit Access of Control Panel
3. Expand or click on "User Configuration", then select "Administrative Templates" and select "Control Panel".
4. In the right Pane Double click on "Prohibit access to the Control Panel" inWindows XP or "Disable Control Panel" in Windows 2000.
5.  A new window will open, Here select "Enable", Then click "OK"
6.  Now Go to START->RUN->type "gpupdate" to update Group Polic

How to create or set system restore point in Windows 7

How to create or set system restore point in Windows 7


System restore point is a representation of a stored state of your computer's system files. You can use a restore point to restore your computer's system files(It doesn't backup your all files in hard drive) to an earlier point in time. System Restorepoints are automatically created by System Restore weekly and when System Restore detects the beginning of a change to your computer, such as when you install a program or a driver.


System image backups stored on hard disks can also be used for System Restore, just like the restore points created by system protection. Even though system image backups contain your system files and personal data, your data files won't be affected by System Restore.

Steps to create a system restore point: 

1. Log in As Administrator.
2. Right-click on My Computer, and then click Properties.
 
System Properties
My Computer ->Properties
3. In the left pane, click System protection. 


System Restore Point in Windows 7
create or set system restore point in Windows 7
4. Click the System Protection tab, and then click Create.
5. In the System Protection dialog box, type a description, and then click Create