Thursday 14 June 2012

Windows 8 Release Preview is out, download now


Windows 8 Release Preview is out, download now


windows, download, beta, windows 8, operating system, release previ
Microsoft accidentally leaked yesterday that Windows 8 Release Preview would become available today and indeed, it's now here, download links are below. Windows 8's development has been considerably more open than on previous releases, we believe in part so Microsoft could introduce and tweak the new Metro interface, which has become the new face of the Windows operating system.
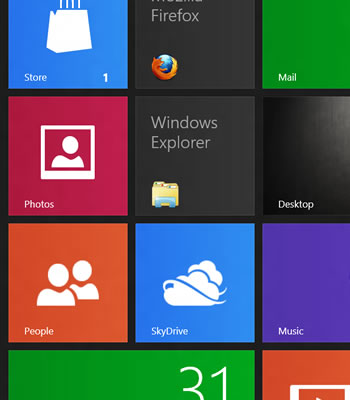
The combination of the new Metro-based Start screen and the traditional desktop has been criticized by many, but at this point it's become apparent there's no turning back. Microsoft is betting heavily on a new paradigm that has the traditional PC and upcoming tablets sharing a common user interface, which also resembles Windows Phone OS’ latest efforts.
We’ll bring you more details on Windows 8 Release Preview changes and new features shortly.
Product Key: TK8TP-9JN6P-7X7WW-RFFTV-B7QPF
Key Features and Changes
  • It delivers new Bing apps, including ones for Travel, News and Sports
  • Improvements to Mail, Photos and People apps since the Consumer Preview
  • Increased personalization options for the Start screen
  • Improved multi-monitor support
  • Refinements to the way people find and download apps through the Windows Store
  • New Family safety features and enriched privacy and security controls when browsing online, including Do Not Track capabilities being turned on by default with Internet Explorer 10
  • Enriched support for touch with Internet Explorer 10, including a new capability with the Release Preview called “flip ahead” that allows users the option to flip between pages with the swipe of a finger, as well as a touch-friendly  Adobe Flash Player now fully integrated into IE10; IE10 is also the first browser to enable Do Not Track “on” by default, giving customers more choice and control over their privacy
Here's a handy list of relevant Windows 8 stories, so you can catch up while you download:

Install Windows 8 From a USB Drive, Dual-boot with XP, Vista and 7


Install Windows 8 From a USB Drive, Dual-boot with XP, Vista and 7

Install Windows 8 From a USB Drive, Dual-boot with XP, Vista and 7

Back when the Windows 8 Consumer Preview hit the Web, we offered a basic guide on configuring a virtual machine. With Windows 8's Release Preview available and the final version inching toward completion, we figure it's a great time to offer a similarly easy step-by-step walkthrough on installing Windows 8 with a USB drive.
If you're familiar with the process, there isn't much for you to see here, but this should serve as a quick confidence booster for anyone who hasn't installed an operating system recently.
Step One
Download Windows 8 and the Windows 7 USB/DVD tool
If you're not sure what version of Windows 8 to download, we'd recommend the 64-bit build, especially if your system is relatively modern. You can read more about the difference between 32-bit and 64-bit operating systems here and the download page linked above provides system requirements for each architecture. The short of it: Windows 8 64-bit requires an extra 1GB of RAM and 4GB of storage -- negligible for most users. Also, before you ask, the Windows 7 USB/DVD tool will work fine with Windows 8.
Step Two
Create a bootable Windows 8 USB drive
Naturally, to create a bootable USB drive, you'll have to insert one and it needs to be 4GB or larger. Install the Windows 7 USB/DVD tool. Once the utility opens, you should be able to browse for and select the Windows 8 ISO you downloaded as well as the USB drive you inserted. It's worth noting that your USB drive will be wiped, so save anything important. The process takes about five minutes depending on the speed of your drive. You'll see a message that reads "backup completed" when it's done.
Step Three
Install the Windows 8 Release Preview (key: TK8TP-9JN6P-7X7WW-RFFTV-B7QPF)
Needless to say, back up anything important before proceeding. If you plan to upgrade or overwrite your installation of Windows XP, Vista or 7, open the root directory of your USB drive in Windows Explorer and launch Setup.exe to begin. You'll get to choose between the two. Windows 7 users should have a painless upgrade as programs, Windows settings as well as user accounts and files are imported. However, Windows 8 won't save programs from Vista and it won't save programs or Windows settings from XP.
 
If you want to dual boot Windows 8 with your existing operating system, you'll have to install a second storage device or create a new partition. The former is relatively self-explanatory, just attach the drive and choose it during the installation process. The latter, however, requires a little more effort. Vista and 7 users can create a new partition with Windows' Disk Management application (Start > search for Disk Management). Once the application loads, you should see your operating system's drive. Follow these steps:
  • Right click the drive that you want to house Windows 8 and choose "Shrink Volume" (Windows 8 64-bit requires at least 20GB, so shrink your current partition accordingly)
  • Right click the new "Unallocated" space and create a "New Simple Volume"
  • Choose the next available drive letter and quick format the partition with NTFS (you can name the volume anything, but we'd suggest something like Windows 8 RP x64)
Windows XP users will have make partition adjustments with a third-party tool such as Partition Logic, but you'll do the same thing: shrink one volume to create another. It should be smooth sailing from here as Microsoft's installation process guides you through everything. Just boot off your Windows 8 USB drive, choose a custom installation and select your newly created partition. If you're having trouble launching the USB drive, you probably just have to put it ahead of your system drive in the BIOS (look for boot options).
If you want to get rid of Windows 8, load your primary OS and launch partition software (again, Disk Management for Vista or 7 users). Delete the Windows 8 volume and extend your remaining partition into the freshly unallocated space. Removing Windows 8 could screw up your bootloader and prevent your original OS from starting properly. Don't panic, this is a simple fix. Windows Vista and 7 users can use the automatic Startup Repair, while Windows XP users will have to get their hands a little dirtier.

Facebook launches dedicated camera app for iOS


Facebook launches dedicated camera app for iOS


Facebook has released a dedicated camera app that’s designed to make it faster and easier to upload photos to the social network in addition to editing your pics and browsing those uploaded by your friends.
When a user opens Camera, they will see a stream of photos uploaded by their friends and family. Swiping side to side reveals more photos while tapping a picture enlarges it.
The app also allows users to upload multiple photos at once instead of having to load each image individually. The procedure should be familiar to Apple users; simply tap to checkmark the photos you want to upload from your album. There are options to tag friends and add captions before mass sharing.
The company has also included some basic editing features such as the ability to crop, rotate and select from up to 15 filter effects.
Contrary to what you might expect, the app doesn’t use any features from Instagram as that deal has not yet been finalized. As such, the timing and decision to release Facebook Camera seems a bit unusual as one would think it’d be best to wait and implement features from that acquisition into a dedicate camera app.
Facebook Camera is available now in the App Store for Apple’s iPhone (3GS and higher), iPad (except the first-gen model) and the fourth generation iPod touch free of charge. No word yet on if there is an Android version in the pipeline but we can’t imagine why there wouldn’t be.

Intel Core i7-3720QM: Mobile Ivy Bridge Review


Intel Core i7-3720QM: Mobile Ivy Bridge Review

prem
Ivy Bridge didn’t create the splash we hoped for on the desktop, providing a modest performance increase over existing Sandy Bridge processors. That said, looking back on it, Intel only anticipated a 10 -15% boost, so many enthusiasts -- including us -- probably had unfairly high expectations.
Instead of breaking new ground in performance, Ivy Bridge improves efficiency, marking the arrival of Intel's 22nm design process which uses new 3D transistors. This allows the flagship quad-core 3.5GHz Core i7-3770Kto consume less power than the more modest Sandy Bridge i5-2500K.


Granted, the 19-watt power savings we recorded in our tests probably won't excite desktop users, but it does present a tangible benefit for battery-bound mobile machines. Ivy Bridge's improved fuel efficiency should grant laptops a little more mileage away from wall chargers.


Third-generation Core i7 mobile processors are finally becoming available in a wide range of notebooks, including the Core i7-3720QM-packing Asus N56VM we're checking out today. Although we're not sure how much this laptop will retail for, we estimate it will cost around $1,400 as its sibling, the N56VZ, can be had for $1,000 and is equipped with the slightly slower Core i7-3610QM.
In any case, the focus of this review will be primarily on the Core i7-3720QM processor, so let's move ahead...
Intel 3rd Gen Core Mobile Lineup
As of writing, only mobile Core i7 Ivy Bridge processors are widely available, so shoppers will likely have to wait until later this year for more affordable varieties. Intel has unveiled six mobile Core i7 Ivy Bridge chips, which operate from 2.30GHz to 2.9GHz with TDPs of 35w, 45w and 55w. Here's a table comparison:


As you may notice, the i7-3920XM and i7-3820QM are virtually identical to the desktop Core i7-3770, carrying a full 8MB L3 cache. The only real differences are the mobile chip's lower operating frequency and TDP, as well as their higher maximum GPU frequency. Like the desktop Core i7 processors, Hyper-Threading is enabled on all mobile i7s, so they feature four cores with eight threads.
The i7-3900 and i7-3800 parts have the full 8MB cache while the i7-3700 and i7-3600 chips have a smaller 6MB L3 cache. The difference in cache is the greatest contributing factor in performance, though it's important to consider the operating frequency of both the CPU and the on-die GPU.


Accompanying these new mobile processors are six 7-series mobile chipsets. The HM77 is the flagship model and the most desirable of the family as it includes four USB 3.0 ports along with Intel’s Smart Response Technology (SRT), which lets you use a low-capacity SSD as cache for your hard drive. This technology drastically increases the overall system performance without sacrificing storage capacity.
Cheaper laptops will likely opt for the more affordable HM75 or HM76 chipsets which lack SRT. The HM76 does, however, maintain USB 3.0 support, while the HM75 dumps it entirely making it far less attractive.
Intel has introduced a chipset for ultraportable devices and the mobile Ivy Bridge processors are expected to really push this segment. The UM77 supports ten USB 2.0 ports, four USB 3.0 ports and four SATA ports (only one 6Gb/s). There are also two business-oriented Q-series chipsets known as the QM77 and QS77 with everything found in the HM77 in addition to Active Management Technology.
All mobile 7-series chipsets include Intel’s Anti-Theft Technology, which let you remotely lock a laptop if it's stolen, and Wireless Display (WiDi -- requires an adapter for your monitor).

Monday 4 June 2012

Facebook Messenger ...Instant message...


Facebook Messenger for Windows with Multiple Tabs

 Facebook Messenger was available for Android and iPhone initially and couple of days ago they released facebook messenger for pc that lets windows 7 users to bring their fb chat feature right into their desktop. The recent release with beta version has a clean interface with no multiple tab feature. The leaked facebook messenger for windows PC download now has multiple tabs and FB Notification also perfectly integrated and working very well. Now you can, Accept Friend Requests. and Access your News Ticker to see what your friends are doing.

Add caption

But we didn’t get a notification for the chat replies. Here i have some screenshots to showcase it with adownload link to the new messenger software which we believe that this might be the next update and not sure whether it will become the stable release.

Facebook Chat Messenger for Windows PC


Thanks for reading and please do share this post to let your friends across social network also experience the facebook chat software.

is there any questions about this? please access the F.A.Q about Facebook Messenger for Windows PC here 

Download Facebook Messenger via Facebook [482 K]

Sunday 3 June 2012

Gigabyte unveils "world's lightest" carbon fiber notebook


Gigabyte unveils "world's lightest" carbon fiber notebook

Gigabyte has taken the wraps of what it claims is the world's lightest notebook: the Gigabyte X11. As the name suggests this is an 11-inch system —11.6 specifically — and the Taiwan-based manufacturer has used an all carbon fiber enclosure to achieve an impressive light weight of 975g (2.15 pounds). For reference, Apple’s aluminum-body 11.6-inch MacBook Air is just slightly heavier at 1,080 grams (2.38 pounds).
Design-wise the X11 features a wedge-shaped design that goes from 3mm (0.19 inches) at the front to 16.5mm (0.65 inches) on the back. Opening the lid you’ll see an aluminum hinge, a chiclet-style keyboard with a backlight and ambient light sensor, and a large buttonless touchpad. Ports include power, USB 2.0 and mini DisplayPort on the left side plus microSD, combo audio and USB 3.0 on the right.
Under the hood the system features an unidentified “3rd generation Intel Core” processor (Ivy Bridge) and Mobile Intel HM77 Express chipset with Intel HD Graphics 4000, 4GB of DDR3 RAM, 128GB solid state drive,  a 1366 x 768 pixel LED-backlit display, 1.3 megapixel camera, 802.11b/g/n Wi-Fi, and Bluetooth 4.0, as well as a choice between Windows 7 Home Premium or Professional operating systems.
Expect the Gigabyte X11 to arrive in July 2012 priced from $999 to $1299 depending on configuration.

Change the Default Save Folder in a Windows 7 Library To a Custom Folder


Change the Default Save Folder in a Windows 7 Library To a Custom Folder


When you save a file in a program and you don’t manually change the folder, the file ends up in My Documents by default. What if you want most files to be saved to a different folder without having to navigate to it every time?
We’ve written about how to change the default save location in Word 2007 and 2010 and how to use a third-party tool to change the default save location for any library (the tool also allows you to create new libraries and add folders to libraries).
However, to change the default save location for libraries accessed in programs other than Word, you don’t need any third-party software. You can even add your own custom folder to a library and specify it as the default save location. We will show you two ways to do this.
The first method is to open Windows Explorer, right-click on any one of the libraries, and selectProperties from the popup menu. For this example, we will use the Documents library. The same steps apply to any of the other three default libraries, or custom libraries you have added. The names of the dialog boxes to which we refer reflect the chosen library.
01_selecting_properties_for_library
The Documents Properties dialog box displays. Each of the four default libraries has two folder locations: one from your user folder (e.g., C:\Users\Lori) and one from the Public profile folder (e.g.,C:\Users\Public). To add a custom folder to the selected library, click Include a folder.
02_clicking_include_a_folder
The Include Folder in Documents dialog box displays. Navigate to the custom folder you want to use as the default save location, select it, and click Include Folder.
03_include_folder_dialog_library_properties
The custom folder is added to the list of Library locations. Select the custom folder and click Set save location.
04_clicking_set_save_location
The check marks moves to the custom folder indicating it is now the default save location. Click OK to save your changes and close the dialog box.
05_clicking_ok_documents_properties
The second method is to open Windows Explorer and open the library that contains the folder you want to use as the default save location, or to which you want to add a custom folder as the default save location. Click the Includes: X locations link in the header of the right pane in Explorer. The X locations link shows how many folders are currently included in that library. Moving the mouse over the link displays the names of the folders included in that library.
06_clicking_locations
The Documents Library Locations dialog box displays. To add a custom folder to this library, clickAdd.
07_clicking_add
On the Include Folder in Documents dialog box, navigate to the custom folder you want to use as the default save location, select it, and click Include Folder.
08_include_folder_dialog_from_locations
The custom folder is added to the list of Library locations. Select the custom folder, right-click on it, and select Set as default save location from the popup menu.
09_select_set_as_default_save_location
Click OK to save your changes and close the dialog box.
10_clicking_ok_document_library_locations
If you use Dropbox, you can also set your Dropbox folder as the default save location. A folder on an external hard drive or on a network drive can also be used as the default save location.